Search results

ironing"" - Results: 153

Frequent questions

Yes and it is then not necessary to fill the water tank. For dry ironing, do not press the steam trigger.
At the end of ironing and once the iron has cooled, we advise you to wipe the soleplate and the steam outlet holes, in order to remove any fibers which could have burned and collected around the holes.
Some laundry starches and synthetic fibres may stick to the surface of the iron. Please clean the Iron's surface.
Yes and you do not need to fill the tank with water. Set the variable steam control to Dry and set the temperature to suit the type of material (care points •, ••, •••).
At the end of your ironing session, we would suggest that once your iron has cooled down, you should wipe over the soleplate and around the steam holes to remove any burned fibers that may have started collecting around the steam holes.
• Avoid using water that is too hard (hardness greater than 30°f, or 17°dH or 21°e) or containing impurities which could cause a build-up of residue.
• Avoid placing your iron on metal objects such as zippers and buttons.
• Do not lay your iron flat on rough surfaces.
• After ironing, empty the water tank and store the iron on the heel.
• Use a soft damp cloth to wipe your iron and never use cleaners or solvents.
• Run the cleaning program when the "Calc Clean" light flashes:
You must take precautions so that using your iron is risk-free.

• Above all, never leave a hot iron unattended.
This is not only to avoid overheating of the iron or the surface on which it is placed but also to ensure that no-one gets burned. If safety is one of your main concerns, choose an iron that has an automatic cut-off function.
Never leave a hot iron within reach of children or pets who risk knocking it over and injuring themselves.

• Like any electrical appliance, never put your iron in water.

• Do not use an iron that has fallen down or has a damaged power cord. If you have the slightest doubt concerning the condition of your iron, contact the Service Centre.

• Always unplug your iron before leaving it, cleaning it or filling it with water (unless it is a model that has a removable water tank). Regularly check the water level to ensure that there is always enough.
Four good tips:
After use, empty the tank, close the steam control, set the thermostat to minimum and stand the iron upright or place it on the base (depending on model).
Cleaning:
Use a damp soft cloth to wipe your iron and never use cleaners or solvents.
If your iron has an auto-clean function, refer to the instruction manual before using it.
Tips:
• Always use untreated water in your iron. If your water is very hard, we recommend you use a mix of 50% untreated tap water and 50% distilled water.
• Avoid placing your iron on sharp objects such as zip fasteners and metal buttons.
• Do not put your iron down flat on rough surfaces.
3 possible causes:
• There is no power in the mains socket: check that the plug is properly connected, or try to plug the iron into a different socket.
• Temperature control set too low: set the temperature control to a higher temperature.
• The automatic electronic cut-out* is active: move your iron.
* depending on model
To avoid damaging the soleplate, follow this advice:
• Always place your iron on its heel rest or its base (depending on model).
• Avoid ironing over abrasive items (buttons, zip fastenings, etc.).
• Never clean your iron's soleplate with abrasive or metallic pads.
There are 2 possible causes:
• There is no power in the mains socket: check that the outlet is firmly plugged in, or try plugging the iron into other wall sockets.
• The Auto Off feature has been activated (the "Auto off" light flashes): move your iron to restart it.
It is normal. Your iron generates a lot of steam; this steam is condensing on the board. Some waterdrops could appeared underneath the ironing board and fall on the flooring.
• Fill the water tank to the Max level.
• Plug in the steam iron.
• Using the "MODE" button, select the fabric you want to iron.
• Once the indicator light for the selected fabric stops flashing, you can start ironing.

Choose a board that is height-adjustable to adjust it to your height. It should be steady and robust so that you can place the ironing appliance on it.
The board should be perforated to allow the steam to pass through the fibres of the fabric to soften it and make ironing easier. The ironing board cover should also be suitable to allow the flow of steam through.
The "Calc Clean" cleaning program must be carried out:
• Unplug the iron.
• Fill the water tank, then plug the iron back in.
• Place the iron over a sink.
• Press the "MODE" button and the steam trigger simultaneously for 3 seconds.
• The cleaning program is started. The program lasts between 4 and 6 minutes.
• Once the process is completed, the iron turns off automatically.

Caution: Never use descaling agent or vinegar for this operation.

Check the following points:
• The tank is empty or almost empty: add more water.
• The selected temperature is too low and does not allow steam to be produced: set the thermostat to the steam zone (between 2 dots and MAX).
• If your iron has a Dry/Steam control: set it to the Steam position.
• Scale has built up in your iron: descale it.
• Your iron has an intelligent system (a moving sensor) which temporarily stops steam being released when the iron is not moving, even when it is placed horizontally. This function eliminates wasted steam while you are handling the clothes.
No, leave the iron to cool down before putting it away and follow the 4 tips: empty out the water remaining in the tank, set the thermostat to the minimum, close the steam control and stand it upright or place it on the base (depending model).
Never use any descaling agent or vinegar when rinsing the boiler: they could damage it.
• Self-cleaning: heat the iron, unplug it, remove the anti-calc valve and spray the iron over the sink.
• Cleaning the anti-calc valve: Remove the antiscale valve and soak the valve in a cup of white vinegar or plain lemon juice for 4 hours.
Firstly, fill the iron tank to MAX with water.
Set the thermostat control to Max and the steam control on DRY and switch on.
Place the iron on its heel and leave to heat up for around 5 minutes.
Unplug the iron then hold your iron horizontally above the sink.
Remove the anti-scale valve (or set the control to self-clean/autoclean depending on the model). Steam, water and scale deposits will leave the steam chamber through the steam holes and the iron will be clean.
At the end of the operation, push the anti-calc valve back into position. When your iron is cold, you will also be able to use your vacuum to gently suction limescale and dirt that may have clogged the holes in the soleplate.
Some irons (depending on model) can produce steam when set on the One dot setting. However, the majority of our irons will only produce steam when set on the 2 dot or 3 dot setting. When you look on your iron's thermostat dial you will notice that the 2 dot and 3 dot settings have a shaded background, this indicates that the iron will produce steam when the dial is set inside this shaded area.
No, you must always unplug the iron before filling it.

No, leave the iron to cool down before putting it away and follow the 4 tips: empty out the water remaining in the tank, set the thermostat to the minimum, close the steam control and stand it upright or place it on the base (depending model).

Always set your iron to the 'No Steam' function before you start to fill.
Check if:
  • The water tank is empty or almost empty, add more water.

  • Scale has built up in your iron, carry out descaling with the "Calc Clean" cleaning program.

  • The Auto Off feature has been activated (the "Auto off" light flashes), move your iron to restart it.

  • The selected mode is "NYLON", this mode does not allow steam to be produced.
    The iron produces continuous steam only in the "SILK", "WOOL", "COTTON" and "LINEN" modes (you have to press the trigger to get steam).
    The steam jet is available in "COTTON" and "LINEN" modes.


When heating your iron for the first time, you may notice a small amount of odour and smoke, this is simply the engineering residues from the manufacturing process burning off. These are harmless and will quickly disappear.
There could be several reasons for this:
• You are not using the right type of water (Refer to the FAQ "What water should I use for ironing?").
• You have used a starch type product on your laundry (Always spray to the reverse side of the fabric to be ironed and clean your iron afterwards).
• Fibers from clothes have been trapped in the holes in the iron and have become carbonised.
• The clothes have not been rinsed enough and there is detergent left on them or you have ironed a new item of clothing before washing it.
• See the instructions for use to find out what type of water is appropriate and clean the soleplate from time to time with a damp sponge.
The "Calc Clean" cleaning program must be carried out:
• Unplug the iron.
• Fill the water tank, then plug the iron back in.
• Place the iron over a sink.
• Press the "MODE" button and the steam trigger simultaneously for 3 seconds.
• The cleaning program is started. The program lasts between 4 and 6 minutes.
• Once the process is completed, the iron turns off automatically.

If your iron has an anti-calc system, you should clean the anti-calc valve once a month.

To do this:
• Unplug the iron and leave it to cool for 30-45 minutes.
• Empty the water and remove the valve, holding it by the top.
• Let the anti-calc valve soak for 4 hours in a glass of natural lemon juice or citric acid, then thoroughly rinse the anti-calc valve under tap water.
• Reposition the anti-calc valve into your iron. Warning! Never touch the end of the anti-calc valve.
Your iron has been stored horizontally, without draining the water tank and with the selector placed on steam position. When you store your iron horizontally, check that the tank is empty and the selector on "DRY" position.

If your iron has an anti-calc system, you should clean the anti-calc valve once a month.

To do this:
• Unplug the iron and leave it to cool for 30-45 minutes.
• Empty the water and remove the valve, holding it by the top.
• Let the anti-calc valve soak for 4 hours in a glass of natural lemon juice or citric acid, then thoroughly rinse the anti-calc valve under tap water.
• Reposition the anti-calc valve into your iron. Warning! Never touch the end of the anti-calc valve.

You are filling the tank with the "Dry/Steam" control set to Steam – it needs to be in the "Dry" position.
Or, you have over-filled your iron – do not go beyond the "MAX" level on the tank.
You can use your iron for up to 30 seconds before recharging it.
This may be due to the use of chemical descaling agents or additives in the water for ironing. Never use this type of product in the water tank (see our recommendations regarding water to be used). Some residues could also been present in the steam chamber or on the soleplate; use the self cleaning function (Depending model). All linen, especially new garments, must be washed and rinsed thoroughly to remove any soap and chemical deposits before you iron them. If these are not removed by washing they may appear later out of the soleplate in the form of small brown or white spots or streaks on your linen.
• Do not use the steam shot too intensively. Wait a few seconds between each trigger press.
• Only use the steam shot in "COTTON" or "LINEN" mode.
• Press the steam trigger only when the iron is hot (the selected fabric on the LED screen stops flashing and is displayed continuously).
Shiny marks can appear on some fabrics, especially on dark coloured fabrics. We would advise ironing dark clothes inside out and using the correct temperature.
If ironing mixed-fibre fabrics, set the temperature for the most fragile fibre.
Important: The iron takes longer to cool down than to heat up. We recommend that you start with fabrics to be ironed at a low temperature.
This happens when the iron is stored in a room where the temperature is too cold.
Place your iron in a room at ambient temperature then wait a few minutes.
Plug in your iron. The lights no longer flash.
The "Calc Clean" and "Auto off" features cannot be selected with the "MODE" button. This button allows you to select only the fabrics to be ironed ("NYLON", "SILK", "WOOL", "COTTON" or "LINEN").

To activate the "Calc Clean" program:
• Unplug the iron.
• Fill the water tank, then plug the iron back in.
• Place the iron over a sink.
• Press the "MODE" button and the steam trigger simultaneously for 3 seconds.
• The cleaning program is started. The program lasts between 4 and 6 minutes.
• Once the process is completed, the iron turns off automatically.

The "Auto off" function is a safety feature that is activated when the iron remains stationary for more than 8 minutes on its heel or when the iron is flat for 30 seconds.
To restart the iron, move it gently until the light stops flashing.
All irons contain a thermostat light. It is normal for the thermostat to turn on and off. It indicates the thermostat is working and your soleplate is being maintained at the desired temperature. If the auto-off light blinks, you must disengage the auto-off function. This is done by gently shaking the iron which will allow the iron to reheat.
This is normal. The light flashes when the iron is heating up or cooling down.
When the iron reaches the required temperature, the light stops flashing and is displayed continuously.
The "Calc Clean" cleaning program must be carried out:
• Unplug the iron.
• Fill the water tank, then plug the iron back in.
• Place the iron over a sink.
• Press the "MODE" button and the steam trigger simultaneously for 3 seconds.
• The cleaning program is started. The program lasts between 4 and 6 minutes.
• Once the process is completed, the iron turns off automatically.

If the "Calc Clean" light starts flashing when you iron, you can finish your ironing. There is no risk for your clothes or for the device.

The higher the wattage, the faster the iron will reach the desired temperature.
It is essential to select the right ironing temperature.
Your iron has a built-in thermostat controlling the temperature very precisely over the entire surface of the soleplate. The thermostat dial contains international markers with dots corresponding to three ironing temperatures.
Make sure that you use the right temperature for your clothes:
• Marker with 1 dot for synthetic fabrics.
• Marker with 2 dots for wool and silk.
• Marker with 3 dots for cotton and linen.
This function allows you to iron fabrics in situ or on a hanger.
To do this, set the iron temperature button to the maximum position.
• Leave the item on a hanger and gently pull the fabric with one hand.
• Press the steam control button intermittently and move the iron from top to bottom.
As the steam produced is very hot, it softens the fibres and removes creases.
Note: Never use the vertical steam function on an item being worn by anyone.

1 - Blinking: Iron on heating phase.
1 - On: Iron ready to use.
2 - Blinking (depending on model): Iron on Auto-off mode (After 8 minutes without any use).
3 - Blinking: Iron need to be recharged.
The iron has a LED screen which automatically adjusts the temperature of the soleplate very precisely depending on the fabric selected.

The LED screen contains several indications:
• "NYLON" for nylon fabrics.
• "SILK" for silk fabrics.
• "WOOL" for woolen fabrics.
• "COTTON" for cotton fabrics.
• "LINEN" for linen fabrics.

It is essential to select the correct ironing temperature.
There is not enough water in the tank. Fill it up with the quantity indicated in the instructions for use and push spray button several times to fill the system complete.
Shake your iron lightly to turn it back on, the "Auto off" light will turn off and the selected mode light will start flashing.
The anti-calc collector is a scale collector which automatically collects the scale which forms inside your iron. The amount of scale collected depends on the hardness of your water.
The Durillium soleplate:
Regularly clean the soleplate with a damp, non metallic washing up pad. For easier, non-corrosive cleaning of your iron's soleplate, use a damp sponge on the soleplate while it is still warm.
If cleaning dirt off is an issue, use the stick which is made specifically for cleaning the Durillium soleplates.

The stainless soleplate:
Clean the soleplate of your iron when it is cool with a damp cloth or a non-abrasive sponge.

The autoclean soleplate:
It is recommended that you use a soft damp cloth on the warm soleplate, in order not to damage the surface.
Warning: The use of iron cleaner will cause damage to your soleplate's autoclean coating.

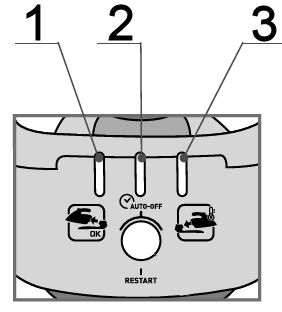
The electronic system cuts the power and the auto-stop light flashes if the iron is not moved for more than 8 minutes (on its heel rest or base) or is left flat for more than 30 seconds. To turn the iron back on, gently shake it until the light goes out.

This is probably crystallized calcium chlorohypochlorite. Carry out the self-cleaning instructions in the instruction manual two or three times. If that hasn't resolved the problem, it may be that your iron needs repair. Please contact the service centre.
• Don't use the Boost steam button intensively. Wait few seconds between each use.
• The temperature button must be placed on Steam area (between 2 dots and MAX).
• Use steam only when the iron is hot (the light must be off).
It is not designed for the water to be removed completely. It is okay to use or store the iron even with a small amount of water remaining. When storing, please remove as much water as possible and store in an upright position.
If it has not been used for a long time (for example several weeks), use it over the sink for a few minutes to remove any residue that could stain your laundry.
Use the right temperatures on the thermostat for the right fabrics. A reason for sticking may be the use of starch. If you want to use starch, simply spray it on the reverse side of the garment, so that there is no contact between the soleplate and the starch. Clean the soleplate from rubber prints of fabric. (Which always must be ironed on reverse side of the rubber prints.)

Gently shake your iron to reactivate it, the lights should start to flash and then the product should start to heat up.

Vertical steaming allows ironing on textiles in place or on the hanger:
• Select "COTTON" or "LINEN" mode.
• Leave the garment hanging on a hanger and stretch the fabric slightly with one hand.
• Press the trigger to the maximum level intermittently in an up and down motion.
The steam produced being very hot, it softens the fibers and removes wrinkles.

Caution: Never steam a garment on a person.
By pressing the "MODE" button you can select the fabric you want to iron:
• "NYLON" for nylon fabrics.
• "SILK" for silk fabrics.
• "WOOL" for woolen fabrics.
• "COTTON" for cotton fabrics.
• "LINEN" for linen fabrics.

No, it is normal to have noise and vibration when the steam is activated. The use of steam triggers the functioning of an electric pump.
Your appliance has been designed to work with tap water. However, it is necessary to regularly perform self-cleaning of the steam generator chamber in order to remove limescale.
If your water is very hard, we recommend that you use a maximum of 50% untreated tap water and 50% distilled water available in most shops.
Never use water containing additives (starch, perfume, aromatic substances, softener, etc.), condensation water (e. g. clothes dryer water, refrigerator water, air conditioner water, rainwater), pure demineralized water or distilled water from store. These contain organic waste or minerals that condense under the influence of heat and cause spitting, brown dripping or premature aging of your device.
Not all of the steam holes release steam, the smaller holes on the soleplate that look like they might be steam holes are actually designed to assist soleplate glide ability.
Please check the following points:
• The tank is empty or almost empty: add more water.
• The selected temperature is too low to use this function: set the thermostat to the zone between 3 dots and MAX.
The "supersteam" or "turbo" function should not be used intensively – wait a few seconds between pressing the button.
To fill the tank, the cursor must be positioned on the “STOP” setting (crossed-out steam symbol).


* Depending on model
The internal parts may make metallic noises with the change in temperature. There is nothing wrong with it.
This system prevents the soleplate from clogging. Its active coating eliminates fibres and impurities that often become stuck to the plate and end up reducing its glide.
Do not use your appliance. To avoid any danger, have it replaced by an approved repair centre.
If the temperature of your iron is adjustable (depending on the model), use steam occasionally when the temperature is set low on the iron.
Place the iron's temperature control to the type of fabric to be ironed and set the steam output (If the setting temperature control is on Synthetics, the setting steam control must be on MIN).
Some laundry starches and synthetic fibres may stick to the surface of the iron. Please clean the Iron's surface.
To avoid damaging the soleplate, follow this advice:
• Always place your iron on its heel rest or its base (depending on model).
• Avoid ironing over abrasive items (buttons, zip fastenings, etc.).
• Never clean your iron's soleplate with abrasive or metallic pads.
It is normal. Your iron generates a lot of steam; this steam is condensing on the board. Some waterdrops could appeared underneath the ironing board and fall on the flooring.
Choose a board that is height-adjustable to adjust it to your height. It should be steady and robust so that you can place the ironing appliance on it.
The board should be perforated to allow the steam to pass through the fibres of the fabric to soften it and make ironing easier. The ironing board cover should also be suitable to allow the flow of steam through.
• You have just refilled the reservoir and changed the "anti-calc" cartridge or you have just begun to use the device. ==> Press and hold the steam button for 2 or 3 minutes, keeping the iron away from your clothing to prime the pump.
• The "anti-calc" cartridge is not installed or incorrectly installed in the appliance. ==> Make sure that the "anti-calc" cartridge is installed and fully engaged in its compartment.
• Steam cannot be created at the temperature you have selected. ==> Adjust the thermostat to the steam zone (••• or to MAX).
• The water tank is empty. ==> Fill the tank.
A steam generator is the most powerful iron that generates vast amounts of powerful steam in a separate boiler unit and pumps that steam constantly and consistently through the iron's soleplate straight into the clothes. The benefit is that this halves your ironing time and produces fantastic ironing finishes. A steam station is similar to an ordinary iron but has a larger water tank. The water is pumped up to the iron and the steam is generated in the iron not a separate boiler unit. The steam output is constant but not as powerful as a steam generator.
Shiny marks can appear on some fabrics, especially on dark coloured fabrics. We would advise ironing dark clothes inside out and using the correct temperature.
If ironing mixed-fibre fabrics, set the temperature for the most fragile fibre.
Important: The iron takes longer to cool down than to heat up. We recommend that you start with fabrics to be ironed at a low temperature.
This can be due to:
• Trying to use steam before the iron is hot enough. Depending on the model of generator, when ironing on a low temperature, decrease the steam output by adjusting the steam output dial on the control panel. Wait for the iron temperature control light to go out before ironing.
• The water may also have condensed in the pipes because you are using steam for the first time or you have not used it for some time. In which case hold the iron away from the ironing board and press the steam control button until it produces steam.
• Over-use of the turbo steam function can cool down the iron soleplate. In this case stop using the turbo steam function and allow the iron temperature control light to come on and go off again before using this function again.
• The boiler may be too full. Do not fill it right to the top.
• Your iron is too hot, see our recommendations on temperature control settings in your product manual.
• You are using starch. Only spray starch on the reverse of the fabric to be ironed.
The steam is more or less significant depending on the temperature setting of the iron. We advise you to use steam occasionally when the temperature is set low on the iron, otherwise drops of water could appear on your laundry.
These functions means that your steam generator is fitted with an electronic regulation which offers you the perfect temperature and steam combination allowing you to iron all your ironable fabrics without risk and without having to sort them.
This function allows you to iron fabrics in situ or on a hanger.
To do this, set the iron temperature button to the maximum position.
• Leave the item on a hanger and gently pull the fabric with one hand.
• Press the steam control button intermittently and move the iron from top to bottom.
As the steam produced is very hot, it softens the fibres and removes creases.
Note: Never use the vertical steam function on an item being worn by anyone.
The temperature is set too low on your iron, it does not allow you to have steam.
Your ironing board is saturated with water because it is not suited for use with an iron equipped with an extra large reservoir.
We recommend using an ironing board made of steel mesh or with holes.
The generator's safety mechanism has activated. You need to get the generator checked by an authorised service agent.
Yes this is because the steam is generated in a separate area away from the soleplate of the iron. This allows you to obtain steam on the lowest heat setting, e.g. silks. However, when the iron temperature control is set to the lowest setting you must also set the steam output control dial (depending on the model) to the low position, otherwise water droplets may appear in the steam.
• You are using chemical descaling products or additives in the water. You should never put these products in the water tank. If this is the case, contact an approved service centre.
• Your washing has not been rinsed sufficiently or you are ironing a new item of clothing before washing it. Ensure that you have rinsed your clothes thoroughly in order to to remove soap deposits or chemicals from new garments which could stick to the iron.
• You are using the steam function for the first time or you have not used the steam function in some time. ==> Press the steam button on your ironing board until the iron produces steam.
• The setting is not correct (1 point/2 points) and the soleplate is not hot enough to produce steam. ==> Adjust the iron to 3 (••• or MAX) and wait for the iron thermostat light to deactivate before using the steam button again.
The Durillium soleplate:
Regularly clean the soleplate with a damp, non metallic washing up pad. For easier, non-corrosive cleaning of your iron's soleplate, use a damp sponge on the soleplate while it is still warm.
If cleaning dirt off is an issue, use the stick which is made specifically for cleaning the Durillium soleplates.

The stainless soleplate:
Clean the soleplate of your iron when it is cool with a damp cloth or a non-abrasive sponge.

The autoclean soleplate:
It is recommended that you use a soft damp cloth on the warm soleplate, in order not to damage the surface.
Warning: The use of iron cleaner will cause damage to your soleplate's autoclean coating.
Before cleaning, ensure that the appliance is unplugged and that the soleplate and iron rest plate are cold.
Do not use any detergents or descaling products to clean the soleplate or base unit. Never hold the iron or its base unit under tap water.

• Cleaning the base unit:
Clean the plastic parts from time to time with a soft, slightly damp cloth.

• Cleaning the scale collector:
Wait until the appliance has been switched off for at least 1 hour.
Remove the scale collector by lifting and rotating the flap a quarter turn.
Rinse the scale collector under the tap and put it back on the iron.

• Self-cleaning of the soleplate (depending on model):
When the anti-calc indicator blinks, perform the steps described in this video.
Yes. However, if you notice that the steam cord is damaged, have it repaired by an authorised service partner.
The appliance is faulty; stop using your maxi steam iron and contact an Approved Service Centre.
Untreated tap water:
Your appliance has been designed to use untreated tap water.
If your water is very hard, mix 50% untreated tap water and 50% distilled water.

Types of water not to use:
Heat concentrates the elements contained in water during evaporation. The types of water listed below may contain organic waste, mineral or chemical elements that can cause spitting, brown staining or premature wear of the appliance:
- water from clothes dryers
- scented or softened water
- water from refrigerators, batteries, air conditioners
- rain water
- boiled, filtered or bottled water

In order to ensure the best performance from your iron, these types of water should not be used for ironing.
Before any maintenance, make sure that the appliance is unplugged and that the soleplate, boiler and iron rest have cooled down (at least 2 hours after ironing).
Do not use any maintenance or descaling product to clean the soleplate or the base unit. Never hold the iron or its base unit under a running tap.
Cleaning the base unit:
• Wipe the plastic parts from time to time using a slightly damp soft cloth.
Maintaining the boiler (once a month):
• Please note: To prolong your boiler's efficiency and avoid scale deposits, you must rinse the boiler every 10 uses (around once a month).
• Check that the generator is cool and has been unplugged for more than 2 hours.
• Slowly loosen the boiler cap. If your generator boiler has an anti-calc rod, take this out and rinse it under the tap before placing it back in the boiler.
• Use a jug to fill the boiler with tap water until it is 3/4 full.
• Shake the base unit gently for a few seconds then empty it completely over the sink.
• For best results, we recommend that you perform this operation once again.
If you live in a hard water area, do this more often. Most of all, do not use any descaling products to clean the boiler as they could damage it.
The "anti-calc" cartridge is no longer functioning; replace it and then press the reset button for at least 3 seconds. Then press and hold the steam button for 2 or 3 minutes, holding the iron away from your clothes, to prime the pump.
Yes, this is quite normal. The water flow allows the cleaning of the soleplate interior.
You did not press the reset button.
Press it until the light stops flashing, then press and hold the steam button for 2 or 3 minutes, holding the iron away from your clothes, to prime the pump.
If the problem persists contact an Approved Service Centre.
No, it is normal to have noise and vibration when the steam is activated. The use of steam triggers the functioning of an electric pump.
The self-cleaning operation of the soleplate has to be performed. Refer to the chapter "Maintenance and cleaning", "How to descale my steam generator?".
Yes, this is quite normal. The self-cleaning operation causes the electric pump to operate.
The internal parts may make metallic noises with the change in temperature. There is nothing wrong with it.
This system prevents the soleplate from clogging. Its active coating eliminates fibres and impurities that often become stuck to the plate and end up reducing its glide.
Do not use your appliance. To avoid any danger, have it replaced by an approved repair centre.
No. The two cables are separately insulated; they are protected and rigorously checked. However, if you notice that the cable is damaged, have it repaired by an approved repair centre.
No. When starting or using the steam generator you may hear a pumping or vibrating noise along with a clicking sound. This is completely normal and is just the pump injecting water into the boiler or the steam valve opening.
After rinsing the boiler, you need to press and hold the restart button for about 3 seconds to stop the light flashing.
The anti-scale valve plug may be tightened incorrectly or the seal on the inside of the cap has perished.
If the boiler does not operate or the red light on the control panel comes on even though there is still water left in the tank, we suggest you check the water tank is not empty. You can also check the removable water tank (depending on model) is pressed down firmly in place and press the restart button located on the control panel. Also the steam output control dial may be set at minimum (depending on Model); therefore turn the dial up to increase the steam.
If your red water light is flashing there is no water in the water tank or the tank is not fully or firmly pushed down.
No. The pressure is at a relatively low level.
Your appliance has two safety systems:
• a valve avoids any excess pressure and, in the event of malfunction of the appliance, allows the surplus steam to escape ;
• a thermal fuse to avoid any overheating.
The formation of lime scale is avoided because the water is not in direct contact with the heating element, which is located outside the tank. However, the tank should be rinsed after 10 uses to avoid lime scale deposits.
The "ECO" function allows you to reduce energy consumption. This means that less electricity is used and therefore slightly less steam is generated.
Yes, this is normal. This is due to the flow of cold water into the boiler that contains hot water.
You must take precautions so that using your iron is risk-free.

• Above all, never leave a hot iron unattended.
This is not only to avoid overheating of the iron or the surface on which it is placed but also to ensure that no-one gets burned. If safety is one of your main concerns, choose an iron that has an automatic cut-off function.
Never leave a hot iron within reach of children or pets who risk knocking it over and injuring themselves.

• Like any electrical appliance, never put your iron in water.

• Do not use an iron that has fallen down or has a damaged power cord. If you have the slightest doubt concerning the condition of your iron, contact the Service Centre.

• Always unplug your iron before leaving it, cleaning it or filling it with water (unless it is a model that has a removable water tank). Regularly check the water level to ensure that there is always enough.
3 possible causes:
• There is no power in the mains socket: check that the plug is properly connected, or try to plug the iron into a different socket.
• Temperature control set too low: set the temperature control to a higher temperature.
• The automatic electronic cut-out* is active: move your iron.
* depending on model
All irons contain a thermostat light. It is normal for the thermostat to turn on and off. It indicates the thermostat is working and your soleplate is being maintained at the desired temperature. If the auto-off light blinks, you must disengage the auto-off function. This is done by gently shaking the iron which will allow the iron to reheat.
The higher the wattage, the faster the iron will reach the desired temperature.
The Durillium soleplate:
Regularly clean the soleplate with a damp, non metallic washing up pad. For easier, non-corrosive cleaning of your iron's soleplate, use a damp sponge on the soleplate while it is still warm.
If cleaning dirt off is an issue, use the stick which is made specifically for cleaning the Durillium soleplates.

The stainless soleplate:
Clean the soleplate of your iron when it is cool with a damp cloth or a non-abrasive sponge.

The autoclean soleplate:
It is recommended that you use a soft damp cloth on the warm soleplate, in order not to damage the surface.
Warning: The use of iron cleaner will cause damage to your soleplate's autoclean coating.
Use the right temperatures on the thermostat for the right fabrics. A reason for sticking may be the use of starch. If you want to use starch, simply spray it on the reverse side of the garment, so that there is no contact between the soleplate and the starch. Clean the soleplate from rubber prints of fabric. (Which always must be ironed on reverse side of the rubber prints.)
Do not use your appliance. To avoid any danger, have it replaced by an approved repair centre.
It is normal. Your iron generates a lot of steam; this steam is condensing on the board. Some waterdrops could appeared underneath the ironing board and fall on the flooring.
Untreated tap water:
Your appliance has been designed to use untreated tap water.
If your water is very hard, mix 50% untreated tap water and 50% distilled water.

Types of water not to use:
Heat concentrates the elements contained in water during evaporation. The types of water listed below may contain organic waste, mineral or chemical elements that can cause spitting, brown staining or premature wear of the appliance:
- water from clothes dryers
- scented or softened water
- water from refrigerators, batteries, air conditioners
- rain water
- boiled, filtered or bottled water

In order to ensure the best performance from your iron, these types of water should not be used for ironing.
Discover how to use the IXEO Power thanks to the following video tutorials.

How to iron a shirt?


How to iron pants?


How to sanitize curtains?


How to iron a dress?


How to steam a jacket?
IXEO is equipped with an anti-calc cartridge system to increase its life span.
On average, 1 IXEO cartridge gives about 8 months of ironing.
When the cartridge reaches the end of its life, the "Anti Calc" indicator light flashes on the product base.

Unfortunately, the anti-calc cartridge (ref. XD5100) is exhausted.

In order to carry on using the appliance:
Do not discard the anti-calc cartridge, but leave it on the appliance and use demineralised water in the tank.

If the "Anti Calc" light is on:
• Switch off and unplug the appliance.
• Remove and empty the water tank.
• Fill the tank with demineralised water.
• Put the tank back in place.
• Plug in and switch on the appliance.
• The appliance is ready for use when the ON/OFF light stops flashing.
• At the beginning of the first use, after adding demineralised water, the "Anti Calc" light will be off. It will turn on after few minutes of use.
• After a few minutes of steaming, the "Anti Calc" light will switch off.

From now on, only use demineralised water to fill the tank.
Do not use your appliance. To avoid any danger, have it replaced by an approved repair centre.
After rinsing the boiler, you need to press and hold the restart button for about 3 seconds to stop the light flashing.
Do not use your appliance. To avoid any danger, have it replaced by an approved repair centre.
The barrel section of the curling iron becomes very hot during use, so be careful to avoid contact with skin and make sure that the cord never comes in contact with hot parts of the appliance.
Yes. Place the hair in between the spoon and barrel at the hair root, then close the spoon thus locking the hair into place. Gently slide the straightening iron to the tip of the hair, this will result in smooth straight hair.
Always unplug your appliance and let it cool on its safety stand. When it is perfectly cold wipe the barrel with a damp duster, never let any water or any other liquid inside the handle.
Yes. You have to wrap the hair around the appliance and wait for approximately 20 seconds before releasing the curl. Repeat this procedure several times and on all the hair. Do not brush your hair once it has cooled, as this will result in a more natural wavy look.
When wrapping the hair locks around the appliance ensure to use the same section of the appliance, do not attempt to use its entire length. Hold the stay cool tip with your free hand.
Once you have selected the required setting, you will have to wait between 1 and 2 minutes for the appliance to reach the right temperature.
In some regions where the water contains high levels of iron, the natural lime deposit inside your kettle may take on a brown or black colour.
Specks and marks are minerals deposited on the surface of the pot that naturally occur in water, such as calcium, silicon, magnesium, and iron. You do not have to worry about these.
• ​Overheating can cause brown or blue stains.
• Food films, if not removed, will cause discoloration on the pot when it is reheated.
• Large amounts of iron content in your water may cause your pot to look rusty.
Non-stick cookware:
Cleaning by hand in soapy water is enough.
The pan must be cleaned each time it's used to remove the film of grease that can stay on the surface. If the pan is only wiped with a paper towel or rinsed in water, the film won't be fully removed and may cook the next time you use the pan: stains may appear.
Non-stick pans must not be cleaned with scouring powders or scouring pads. A nylon sponge is ideal for both the interior and exterior of the pan.

Ceramic cookware:
We recommend to wash the ceramic pan manually, with water and a mild detergent. In this way, it's the most effective.
If the pan might not be clean enough during the normal dishes, you could add a splash of vinegar and water into the pan and heat it. The water / vinegar mixture will clean cook the pan. After this, rinse the pan well, dry and rub with a little bit of sunflower oil for example. And your pan will be as new.
If the base is stubborn dirt, you can wet the pan soak first with hot water and a good degreasing dishwashing detergent. Next, if necessary, you can clean the pan with a plastic scouring pad and some liquid abrasive cleaning detergent.

Hard anodised cookware:
To prolong the life of your pan, we recommend hand washing with a non-abrasive sponge.
An exterior coating protects your cookware from the harmful consequences of dishwashing. It is therefore extremely important not to damage this coating and we recommend that you avoid the use of scouring pads (Scotch Brite).
In case of dishwasher use, it is preferable to use gentle detergents such as a liquid or gel.
Moreover, a too intensive use of the dishwasher is not recommended.
Washing by hand without scouring pads extends the life time of your cookware.

Stainless steel cookware:
For daily cleaning, warm soapy water is sufficient. We recommend you to clean your pan thoroughly after each use as food films left on the pan may cause discoloration and sticking.
To get rid of stuck-on food or discoloration and stains from using too high a heat, we recommend cleaning your product with a stainless steel/copper cleaner. This can be used on the interior, as well as the exterior.
If your water has high iron content, you may notice a rusty discoloration. Use stainless steel/copper cleaner to remove this.
Dishes designed for conventional ovens are compatible with Fry Delight.
Materials: you may use dishes in stainless steel, aluminium, cast-iron, terracotta and silicone, as well as glass dishes designed for use in an oven.
Dimensions: round dishes with a maximum diameter of 16.5 cm and square dishes with sides measuring no more than 14 cm may be used in Fry delight.